
Unified Onboarding
Unified Onboarding enables you to use a single application to onboard customers to both your payment processor and Managed Solutions. Enabling this functionality reduces the friction to using the products enabled in your Managed Solutions instance, driving up potential adoption for net new end customers.
What It Enables
- Single Application Flow: Create one unified application that automatically initiates onboarding in both Managed Banking and configured payment processors.
- Centralized Status Tracking: Monitor the onboarding progress across all systems through a single unified application status.
- Automated Document Management: Documents required by external systems are automatically tracked and synced.
- Event-Driven Synchronization: Status updates from external systems (via webhooks) automatically update the unified application status.
- Support for Business and Sole Proprietor Customers: Full support for both business entities and sole proprietors.
When to Use
Use Unified Onboarding when:
- Your customers need access to both Managed Banking services AND payment processing capabilities.
- You want to provide a streamlined onboarding experience without requiring separate application flows.
- You need centralized visibility into onboarding progress across multiple financial service providers.
Supported Onboarding Scenarios
Unified Onboarding covers three customer scenarios so the same flow works for net-new users and for users who already have a payment processor or Unit banking relationship:
| Scenario | Who it is for | What Unit does |
|---|---|---|
| New customer | End customer has neither a Unit banking account nor a payment processor connected account | Creates a new payment processor connected account and a Unit banking application, then links them through the unified application lifecycle. |
| New customer with pre-existing payment processor account | End customer already has a payment processor connected account that is not fully enabled (open requirements, pending verification, etc.) | Resumes onboarding against the existing connected account: patches it with data collected in Unified Onboarding and continues the normal status, document, and identity-verification lifecycle — instead of creating a second connected account. |
| Existing Unit account not linked as bank on record | End customer already has an active Unit deposit account, but that account is not set as the external bank account (bank on record) on their payment processor connected account | Uses the existing Unit account and sets it as the bank on record on the payment processor account when the user completes the Get Paid step in the embedded component. |
Together these scenarios cover: new users, new customers with a pre-existing payment processor account, and users who already bank with Unit but still need their Unit account linked on the payment processor.
Configure existing payment processor accounts via Pre-Filling Payment Processor Information. The bank-on-record connection path is described in Connecting an Existing Unit Account as Bank on Record.
Application Types
Unified Onboarding supports two customer types:
| Type | Resource Type | Use Case |
|---|---|---|
| Business | businessUnifiedApplication | LLCs, Corporations, and Partnerships |
| Sole Proprietor | solePropUnifiedApplication | Individual business owners operating as sole proprietors |
Application Status Lifecycle
Unified Application Statuses
| Status | Description |
|---|---|
Pending | Application created, initial processing not yet started |
AwaitingDocuments | One or more child applications require document uploads |
AwaitingIdentityVerification | The payment processor requires additional identity verification |
Submitted | Application submitted for review |
InReview | Documents or application under review by external systems |
Approved | All child applications approved |
PartiallyApproved | Some child applications approved, others pending/rejected |
Rejected | Application rejected by one or more systems |
Cancelled | Application cancelled |
Error | Error occurred during processing |
Child Application Statuses
Each child application (Unit, payment processor) has its own status that contributes to the overall unified status:
| Status | Description |
|---|---|
Pending | Child application created, awaiting processing |
AwaitingDocuments | Documents required or previously submitted documents were invalid |
AwaitingIdentityVerification | Identity verification required by the payment processor |
InReview | Documents pending review by the external system |
Approved | Child application approved |
Rejected | Child application rejected |
Payment Processor Settings Configuration
To enable Unified Onboarding with payment processors, you must configure the payment processor settings in your organization's settings.
Configuring Payment Processor Settings
Payment processor settings are configured through the Unit Dashboard.
To configure your payment processor settings:
- Navigate to Settings from the top menu under the Developer section.
- Select the Payment Processing tab.
- Select your Vendor from the dropdown.
- Enter your Secret/Restricted API key (your payment processor secret key).
- Enter your Publishable API key.
- Enter your Webhook secret (your payment processor webhook signing secret).
- Select the applicable Business profile MCC code for your use case.
- Optionally, configure Hostname and Files Hostname for custom configurations.
- Click Save to apply your settings.
Required Settings
| Setting | Required | Description |
|---|---|---|
| Vendor | Yes | Select your payment processor. |
| Secret/Restricted API key | Yes | Your payment processor API key (secret key). This is required for Unit to create and manage accounts on your behalf. |
| Publishable API key | Yes | Your payment processor publishable API key. |
| Webhook secret | Yes | Your payment processor webhook signing secret. This is required to verify incoming webhook events and keep application status synchronized. |
| Business profile MCC code | Yes | The Merchant Category Code for card transactions. |
| Hostname | No | Custom API hostname (for testing or custom configurations). Defaults to the payment processor's production API. |
| Files Hostname | No | Custom hostname for file uploads. |
| Connected Account Lookup URL | No | An HTTPS URL the Unit UI calls (using the user's JWT subject) to resolve the user's payment processor connected account ID. Required for the Get Paid / bank-on-record experience when the user already has a Unit account. |
Supported Payment Processors
Additional payment processors will be added based on partner request.
How Payment Processor Integration Works
- Application Creation: When a unified application is created through the application form, Unit either creates a new payment processor connected account, resumes (patches) an existing incomplete connected account, or associates an already-enabled connected account — depending on the onboarding scenario and any prefill you provide.
- Status Synchronization: Payment processor webhook events update the child application status in real-time.
- Document Requirements: When the payment processor requires identity verification documents, the child application status changes to
AwaitingDocuments. - Verification Flow: Documents can be uploaded through the unified onboarding document upload flow.
- Identity Verification: In certain cases, the payment processor may require additional identity verification. When this happens, the child application status changes to
AwaitingIdentityVerification, and the end customer is presented with an embedded session to complete the verification directly within the onboarding flow. - Bank on Record: After the Unit deposit account exists, Unit can set that account as the external bank account on the payment processor connected account so payouts route to Unit.
Stripe Identity Verification Flow
During Unified Onboarding, Stripe may determine that additional identity verification is required for a connected account. When this happens, Unit integrates with Stripe Identity to provide an in-line verification experience within the onboarding flow.
When Identity Verification Is Triggered
Stripe determines whether identity verification is needed based on its own risk assessment and compliance requirements. When required, Stripe sets the additional_verifications.document.status field on the connected account to unverified. Unit detects this status change through the account.updated webhook event and transitions the payment processor child application to AwaitingIdentityVerification.
How It Works
- Detection: Unit receives an
account.updatedStripe webhook indicating thatadditional_verifications.document.statusisunverified. - Status Update: The payment processor child application status changes to
AwaitingIdentityVerification, which propagates to the unified application status. - Verification Session: Unit creates a Stripe Identity verification session using the configured Stripe API keys. The end customer is presented with an embedded verification component to complete the identity verification (e.g., ID document upload and selfie capture).
- Completion: Once the customer completes the verification and Stripe confirms the result, Unit receives an
account.updatedwebhook withadditional_verifications.document.statusset toverified. - Approval: If identity verification is the last remaining requirement (besides external account setup, which is handled post-banking-approval), the child application status transitions to
Approved.
Status Priority
The AwaitingIdentityVerification status has specific priority behavior in the status derivation:
- Child application level:
AwaitingIdentityVerificationtakes the highest priority — regardless of document verification status, if Stripe requires identity verification, the child application will showAwaitingIdentityVerification. - Unified application level:
AwaitingIdentityVerificationis evaluated afterAwaitingDocuments. If any child application is awaiting documents, the unified status will beAwaitingDocuments. Otherwise, if any child is awaiting identity verification, the unified status will beAwaitingIdentityVerification.
Identity verification is determined by Stripe and may not be required for all accounts. The AwaitingIdentityVerification status only appears when Stripe explicitly requests additional identity verification for the connected account.
Pre-Filling Payment Processor Information
When your product has already onboarded users onto a payment processor, you can tell Unit about their existing connected account so Unified Onboarding links or resumes that account instead of creating a new one.
Return the payment processor fields from your Application Prefill Endpoint — the same HTTPS GET endpoint configured in the Dashboard for Pre-filling User Information. When an end user starts Unified Onboarding, Unit calls your endpoint with the user's JWT and uses the response to pre-fill the application form. Place hasPaymentProcessorAccount and, when known, paymentProcessorAccountId inside applicantDetails in the whiteLabelAppEndUserConfig response. See ApplicationFormPrefill for the full list of prefill fields.
Example response
Return HTTP 200 with a JSON:API document. The example below shows the minimum fields needed to link an existing payment processor connected account. You can combine these fields with any other applicantDetails fields (for example business name, Employer Identification Number (EIN), or address) in the same response.
Link or resume a specific connected account:
{
  "data": {
    "type": "whiteLabelAppEndUserConfig",
    "attributes": {
      "applicantDetails": {
        "hasPaymentProcessorAccount": true,
        "paymentProcessorAccountId": "acct_1ABCDefGHIJKLMNO"
      }
    }
  }
}
paymentProcessorAccountId is the connected account ID from your payment processor (for example, a Stripe Connect account ID such as acct_...). The account must already exist in your payment processor before the user starts Unified Onboarding.
Skip payment processor account creation (when you know the user has a payment processor account but do not have the account ID):
{
  "data": {
    "type": "whiteLabelAppEndUserConfig",
    "attributes": {
      "applicantDetails": {
        "hasPaymentProcessorAccount": true
      }
    }
  }
}
Prefill fields
When to use
| Scenario | What to return | What Unit does |
|---|---|---|
| Customer has a fully enabled connected account | hasPaymentProcessorAccount: true and paymentProcessorAccountId | Unit links the existing account. After the Unit deposit account is approved, Unit sets it as the bank on record on the connected account when applicable. |
| Customer has an incomplete connected account (open requirements, pending verification, etc.) | hasPaymentProcessorAccount: true and paymentProcessorAccountId | Unit resumes onboarding on that account: patches it with data collected in Unified Onboarding and continues the normal webhook-driven lifecycle. |
| Customer has a payment processor account but you do not know the account ID | hasPaymentProcessorAccount: true, omit paymentProcessorAccountId | Unit skips payment processor account creation for that application. |
Behavior when an existing payment processor account is provided
When hasPaymentProcessorAccount is true and paymentProcessorAccountId is provided, Unit inspects the connected account state:
| Connected account state | Behavior |
|---|---|
| Already enabled (no open requirements that block payouts / identity) | Unit does not create a new connected account. After the Unit deposit account is approved, Unit sets that deposit account as the external bank account (bank on record) on the existing connected account when applicable. |
| Incomplete / open requirements (for example awaiting identity verification, pending verification, or other outstanding requirements) | Unit resumes onboarding on that connected account: it patches the existing account (and related persons) with data collected in Unified Onboarding, creates the payment processor child application against the same account ID, and continues the normal webhook-driven lifecycle (documents, identity verification, approval). |
If hasPaymentProcessorAccount is true but paymentProcessorAccountId is omitted, Unit skips payment processor account creation for that application.
By providing these fields, you can:
- Reduce onboarding friction for end customers who are already set up with a payment processor, avoiding duplicate account creation.
- Resume incomplete payment processor onboarding instead of starting over with a new connected account.
- Maintain continuity by linking the customer's existing payment processor account to their Unit banking account.
- Streamline the unified flow so that onboarding focuses on completing whatever is still outstanding (Managed Banking, payment processor requirements, or bank-on-record linking).
Also configure Connected Account Lookup URL in Payment Processor Settings when the embedded component must resolve the end user's payment processor connected account ID from their JWT subject (required for the Get Paid / bank-on-record experience below).
Connecting an Existing Unit Account as Bank on Record
Use this path when the end customer already has an active Unit deposit account but that account is not yet set as the bank on record (external bank account) on their payment processor connected account — for any reason (prior incomplete linking, account created outside the unified create path, etc.).
How it works in the embedded component
- The UI resolves the user's payment processor connected account ID using the Connected Account Lookup URL configured in your payment processor settings (called with the user's JWT subject).
- The user is prompted with a Get Paid / Receive payouts directly into this account call to action — on the account overview and in the post-onboarding checklist.
- Unit verifies whether the Unit deposit account already matches the external bank account on the connected account.
- If it does not match (or is not set), Unit sets the user's Unit deposit account as the external bank account on the payment processor connected account.
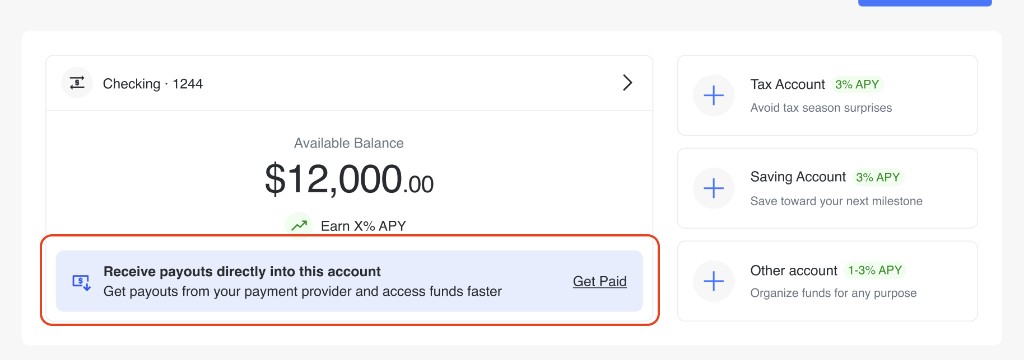
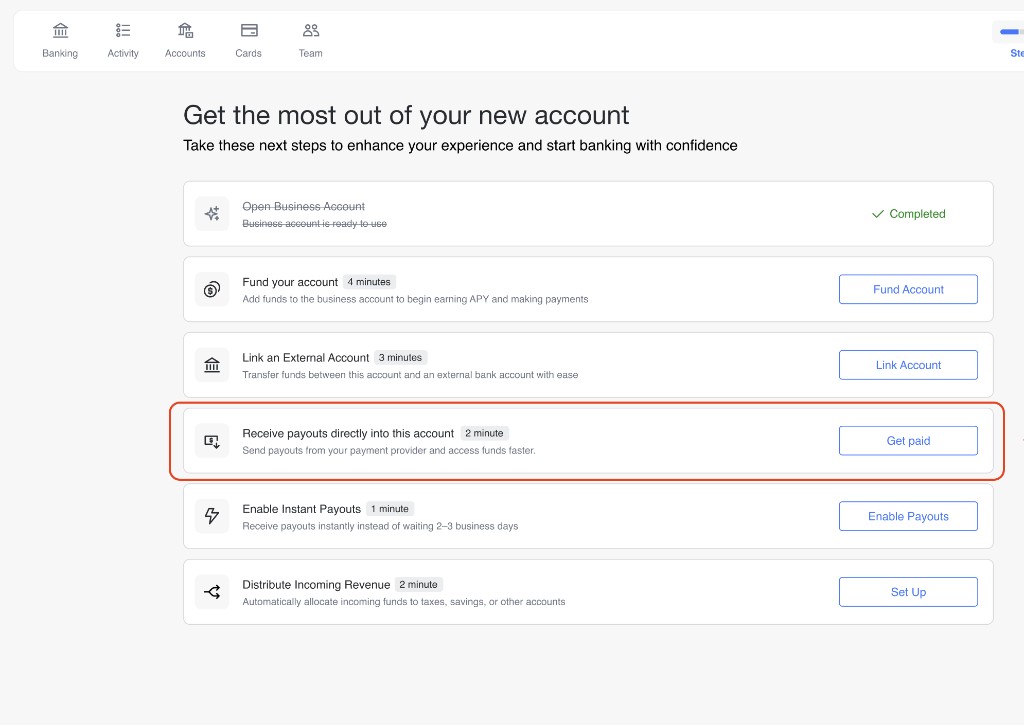
After this step succeeds, payouts from the payment processor can route to the Unit deposit account.
What you need to configure
| Requirement | Description |
|---|---|
| Payment processor settings | Vendor, API keys, and webhook secret as described in Payment Processor Settings Configuration. |
| Connected Account Lookup URL | HTTPS endpoint Unit calls to map the authenticated user (JWT subject) to their payment processor connected account ID. |
| Active Unit deposit account | The end user must already have an open Unit deposit account that can be set as the external bank account. |
This path reuses the same bank-on-record mechanism used after a successful unified banking approval. The difference is the entry point: an existing Unit customer connecting (or reconnecting) their account via the Get Paid CTA, rather than completing a full new unified application.
Unified Onboarding Webhook Events
To receive notifications about unified application status changes, configure a webhook endpoint in your organization settings. Unit will send webhook events when unified applications reach terminal or significant states.
Available Unified Onboarding Webhook Events
| Event Type | Description |
|---|---|
unifiedApplication.created | Fired when a new unified application is created |
unifiedApplication.pending | Fired when the unified application transitions to Pending status |
unifiedApplication.inReview | Fired when the unified application transitions to InReview status |
unifiedApplication.awaitingIdentityVerification | Fired when the unified application transitions to AwaitingIdentityVerification status |
unifiedApplication.awaitingDocuments | Fired when the unified application transitions to AwaitingDocuments status |
unifiedApplication.approved | Fired when all child applications are approved and the unified application reaches Approved status |
unifiedApplication.rejected | Fired when the unified application is rejected |
unifiedApplication.partiallyApproved | Fired when some child applications are approved but others are pending or rejected |
To receive these events, ensure your organization has a webhook endpoint configured that subscribes to unified application events. This allows your system to:
- Track intermediate status transitions throughout the onboarding lifecycle
- Trigger downstream processes when onboarding completes successfully
- Notify internal teams when applications require attention or document uploads
- Update your own systems with the latest application status
- Handle partial approvals where only some systems approved the application
Event Payloads
unifiedApplication.created
Fired when a new unified application is created.
{
  "data": [
    {
      "id": "12345678",
      "type": "unifiedApplication.created",
      "attributes": {
        "userIds": ["user-abc123"],
        "createdAt": "2026-01-15T10:30:00.000Z",
        "childApplications": [
          {
            "id": "1234567",
            "type": "Unit",
            "status": "Pending"
          },
          {
            "id": "acct_1ABCDefGHIJKLMNO",
            "type": "PaymentProcessor",
            "status": "Pending"
          }
        ]
      }
    }
  ]
}
unifiedApplication.pending
Fired when the unified application transitions to Pending status.
{
  "data": [
    {
      "id": "12345682",
      "type": "unifiedApplication.pending",
      "attributes": {
        "userIds": ["user-abc123"],
        "createdAt": "2026-01-15T10:35:00.000Z",
        "childApplications": [
          {
            "id": "1234567",
            "type": "Unit",
            "status": "Approved"
          },
          {
            "id": "acct_1ABCDefGHIJKLMNO",
            "type": "PaymentProcessor",
            "status": "Pending"
          }
        ]
      }
    }
  ]
}
Handling a long-running payment processor Pending status
The unifiedApplication.pending webhook fires when the unified application transitions to Pending. Unit does not send additional notifications while the application remains in Pending.
A payment processor child application can stay Pending while the payment processor is still processing submitted data — for example, when there is an Employer Identification Number (EIN) or address mismatch, or when verification fields on the connected account are still open.
Expected partner behavior: When receiving unifiedApplication.pending, start a timer. If the unified application is still Pending after 24 hours, review the application in the payment processor management console, reach out to payment processor support and/or reach out to the end user — for example, prompt them to review and correct their submitted information (particularly business EIN and address).
Before re-engaging, poll or re-fetch the unified application to confirm it is still Pending.
unifiedApplication.inReview
Fired when the unified application transitions to InReview status.
{
  "data": [
    {
      "id": "12345683",
      "type": "unifiedApplication.inReview",
      "attributes": {
        "userIds": ["user-abc123"],
        "createdAt": "2026-01-15T10:40:00.000Z",
        "childApplications": [
          {
            "id": "1234567",
            "type": "Unit",
            "status": "Approved"
          },
          {
            "id": "acct_1ABCDefGHIJKLMNO",
            "type": "PaymentProcessor",
            "status": "InReview"
          }
        ]
      }
    }
  ]
}
unifiedApplication.awaitingIdentityVerification
Fired when the unified application transitions to AwaitingIdentityVerification status, indicating the applicant must complete identity verification before the application can proceed.
{
  "data": [
    {
      "id": "12345684",
      "type": "unifiedApplication.awaitingIdentityVerification",
      "attributes": {
        "userIds": ["user-abc123"],
        "createdAt": "2026-01-15T10:45:00.000Z",
        "childApplications": [
          {
            "id": "1234567",
            "type": "Unit",
            "status": "Approved"
          },
          {
            "id": "acct_1ABCDefGHIJKLMNO",
            "type": "PaymentProcessor",
            "status": "AwaitingIdentityVerification"
          }
        ]
      }
    }
  ]
}
unifiedApplication.awaitingDocuments
Fired when the unified application transitions to AwaitingDocuments status, indicating additional documents are required before the application can proceed.
{
  "data": [
    {
      "id": "12345685",
      "type": "unifiedApplication.awaitingDocuments",
      "attributes": {
        "userIds": ["user-abc123"],
        "createdAt": "2026-01-15T10:50:00.000Z",
        "childApplications": [
          {
            "id": "1234567",
            "type": "Unit",
            "status": "AwaitingDocuments"
          },
          {
            "id": "acct_1ABCDefGHIJKLMNO",
            "type": "PaymentProcessor",
            "status": "Pending"
          }
        ]
      }
    }
  ]
}
unifiedApplication.approved
Fired when all child applications are approved.
{
  "data": [
    {
      "id": "12345679",
      "type": "unifiedApplication.approved",
      "attributes": {
        "userIds": ["user-abc123"],
        "createdAt": "2026-01-15T11:00:00.000Z",
        "childApplications": [
          {
            "id": "acct_1ABCDefGHIJKLMNO",
            "type": "PaymentProcessor",
            "status": "Approved"
          },
          {
            "id": "1234567",
            "type": "Unit",
            "status": "Approved"
          }
        ]
      }
    }
  ]
}
unifiedApplication.partiallyApproved
Fired when some child applications are approved but others are pending or rejected.
{
  "data": [
    {
      "id": "12345680",
      "type": "unifiedApplication.partiallyApproved",
      "attributes": {
        "userIds": ["user-abc123"],
        "createdAt": "2026-01-15T11:30:00.000Z",
        "childApplications": [
          {
            "id": "acct_1ABCDefGHIJKLMNO",
            "type": "PaymentProcessor",
            "status": "Approved"
          },
          {
            "id": "1234567",
            "type": "Unit",
            "status": "Rejected"
          }
        ]
      }
    }
  ]
}
unifiedApplication.rejected
Fired when the unified application is rejected.
{
  "data": [
    {
      "id": "12345681",
      "type": "unifiedApplication.rejected",
      "attributes": {
        "userIds": ["user-abc123"],
        "createdAt": "2026-01-15T12:00:00.000Z",
        "childApplications": [
          {
            "id": "acct_1ABCDefGHIJKLMNO",
            "type": "PaymentProcessor",
            "status": "Rejected"
          },
          {
            "id": "1234567",
            "type": "Unit",
            "status": "Rejected"
          }
        ]
      }
    }
  ]
}
Unified Onboarding End-User Events
In addition to the server-side webhook events above, the unit-elements-application-form component dispatches browser events during the unified onboarding flow that let your front end react to user interactions on the unified status and summary screens (for example, dismissing the modal or navigating to a follow-up flow after a partial approval).
For the full list of events and example usage, see Unified Onboarding Events.
Stripe API Key Permissions
If you are using a Stripe secret key, all permissions are granted by default. If you are using a Stripe restricted API key (recommended for production), the following permissions must be enabled:
For more information about Stripe permissions, see the Stripe Permissions Reference.
Creating a Restricted API Key
- Navigate to Developers → API keys in your Stripe Dashboard.
- Click Create restricted key.
- Give your key a name (e.g., "Unit Unified Onboarding").
- Set the following permissions:
Required Permissions
| Resource Category | Resource | Permission Level |
|---|---|---|
| Connect | Accounts | Write |
| Connect | Persons | Write |
| Core | Files | Write |
| Identity | Verification Sessions and Reports | Write |
- Click Create key and copy the restricted key to configure in your Unit payment processor settings.
Why These Permissions Are Needed
| Permission | Purpose |
|---|---|
| Accounts (Write) | Create and update Stripe Connect accounts, retrieve account status and requirements, and set external bank accounts after Managed Banking approval. |
| Persons (Write) | Create and update persons (representatives and beneficial owners) on Connect accounts, and attach verification documents. |
| Files (Write) | Upload identity verification document files to Stripe. |
| Verification Sessions and Reports (Write) | Create and manage Stripe Identity verification sessions for identity verification during onboarding. |
Note: Write access in Stripe implicitly includes Read access, so enabling Write for Accounts, Persons, Files, and Verification Sessions and Reports covers all operations in the unified onboarding flow.
Required Stripe Webhook Events
The following Stripe webhook events must be enabled in your Stripe Dashboard (or via API) for the unified onboarding flow to function correctly. These events are used to synchronize the payment processor child application status in real-time.
Events Required for Unified Onboarding
| Stripe Event Type | Purpose | Unified Onboarding Action |
|---|---|---|
account.updated | Fired when account requirements or status change | Updates child application status based on current account requirements (e.g., pending verification, approved, has errors) |
account.application.authorized | Fired when the Connect application is authorized | Initializes the payment processor child application with Pending status |
person.created | Fired when a new person is added to an account | Evaluates person verification status and creates document requirements if needed |
person.updated | Fired when a person's details or verification status change | Updates document status based on verification state: Unverified → document required, Pending → document pending review, Verified → document approved |
person.deleted | Fired when a person is removed from an account | Evaluates impact on child application verification status |
identity.verification_session.created | Fired when an identity verification session is created | Logged for audit purposes |
identity.verification_session.processing | Fired when a verification session begins processing | Logged for audit purposes |
identity.verification_session.verified | Fired when an identity verification session is successfully verified | Logged for audit purposes |
identity.verification_session.requires_input | Fired when a verification session requires additional input from the user | Logged for audit purposes |
identity.verification_session.canceled | Fired when a verification session is canceled | Logged for audit purposes |
identity.verification_session.redacted | Fired when a verification session's collected data is redacted | Logged for audit purposes |
Configuring Webhook Events in Stripe
- Navigate to Developers → Webhooks in your Stripe Dashboard.
- Click Add endpoint and enter the webhook URL provided by Unit.
- Under Events to send, select the events listed in the table above.
- Copy the Signing secret and configure it as the Webhook secret in your Unit payment processor settings.