
Applications
Different bank partners may have different onboarding requirements. If your bank partner is Thread Bank, please refer to the Thread Applications API documentation.
Unit offers a short, low-friction, non-documentary application process - most applications will be approved in under five seconds. In some cases Unit detects an exception in the application process (e.g. a phone number mismatch), and certain documents are required in order to make a decision.
Unit will let you know exactly what documents to require from the customer, and once they are provided (via an API call), the application will either be approved automatically or manually reviewed by us (under an SLA of two business hours).
For more information on applications including specific details about application statuses and flow, see our End-Customer Applications Guide
Some variations to the Applications API may occur, depending on your bank partner. Please reach out to the Unit team to align on the full set of requirements that apply to your onboarding process.
Application Statuses
The final statuses for an application are Approved, Denied or Canceled. Once an application is approved, a Customer resource will be created and associated with the application resource.
The new created customer resources will be referenced in the relationships object.
After an application is approved, ongoing profile updates should be made via Customer APIs rather than Application PATCH endpoints.
In most cases, an application will reach one of these final statuses immediately after creation, without requiring any documents.
In some cases, documents will be required and the application will enter an AwaitingDocuments status. Once you upload all the required documents, Unit will use the information provided to approve or deny the application. The decision may take seconds in some cases and up to two hours in other cases (when a manual review is required). Once the process is complete, you will receive a webhook containing the result.
An application can also be evaluated asynchronously, in which case its status will be Pending as long as the evaluation process is running. Once the process is complete, the status will change to either Approved, Denied or AwaitingDocuments and the relevant webhook event will be fired (see Pending status description below)
There is an option to Cancel Application at any point that is not Pending, Approved or Denied. The status of the application will change to Canceled, and the relevant webhook event will be fired.
Below is a diagram describing the lifecycle of an application:
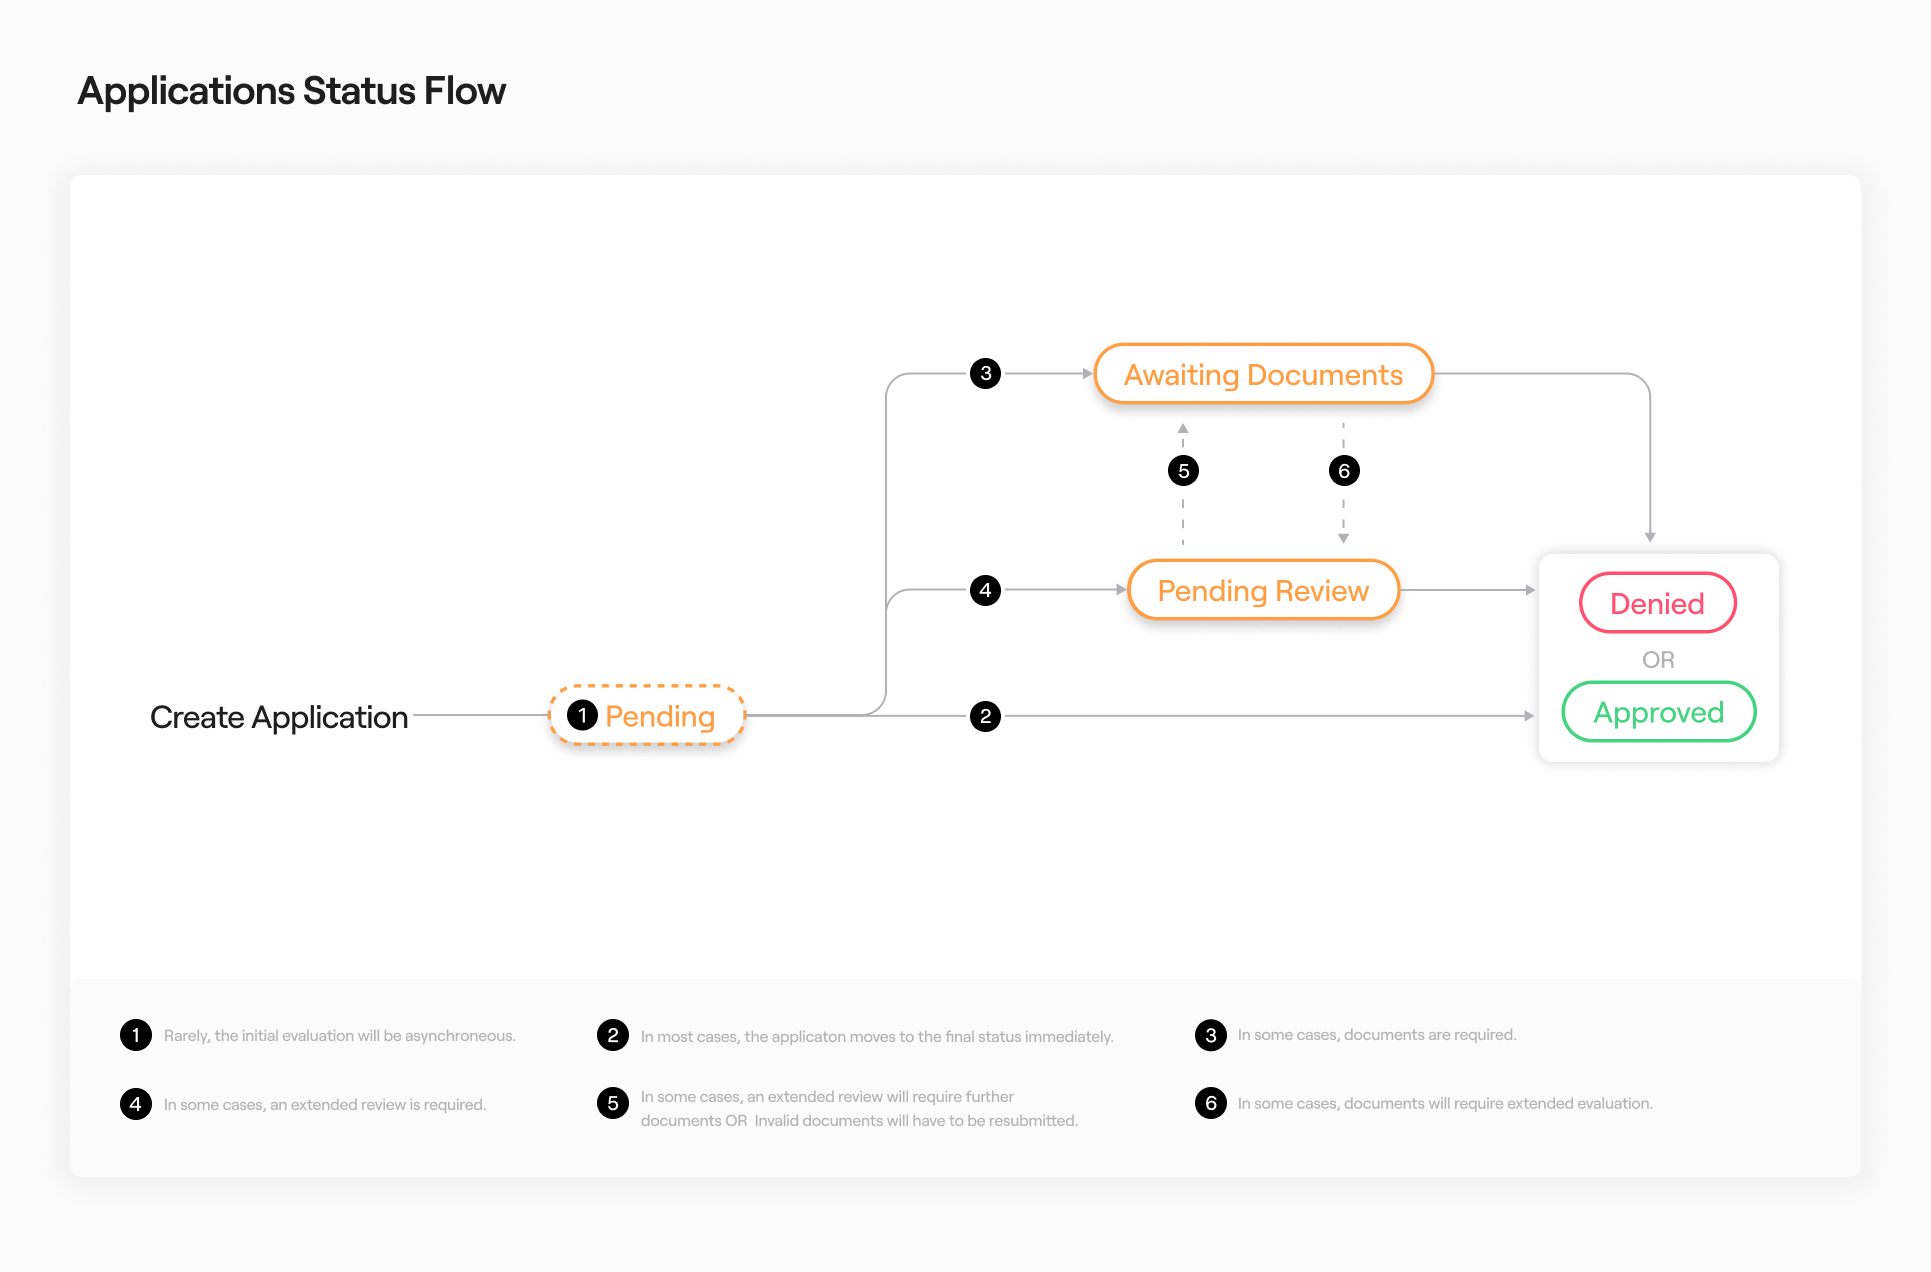
Below are all application statuses and their descriptions:
| Status | Description |
|---|---|
AwaitingDocuments | Certain documents are required for the process to continue. You may upload them via Upload Document. |
PendingReview | The application is pending review by Unit (with an SLA of 2 business hours). |
Pending | The application is being evaluated asynchronously and a result should be available shortly. Listen for webhooks (application.denied, customer.created) and application.awaitingdocuments) for the final result, or periodically query the application with Get by Id). |
Approved | The application was approved. A Customer resource was created. |
Denied | The application was denied. A Customer resource will not be created. |
Canceled | The application was canceled. A Customer resource will not be created. |
Native onboarding integrations
If you collect application data in your own UI (instead of the Unit application form or white-label onboarding components):
- Drive UX from
statusand webhooks —application.denied,application.awaitingDocuments,application.pendingReview, andapplication.approved. There is no separate API field that means "allow reapplication" vs "permanent denial." - Use
attributes.messagefor end-customer copy when present — especially forAwaitingDocuments(what to upload next). Some denial outcomes do not map to a specific public message; use generic denial copy and your support flow. - Evaluation flags — Flag names and denial context shown in the Dashboard are described in End-Customer Applications. They are omitted from the default
GET /applications/{id}response; request them withextraFields[application]=evaluationFlags,decisionReasonCodeswhen needed on the server. See Sandbox application simulations. - Sandbox testing — Reserved SSNs (for example
000000001forDenied) are documented under Application simulations. Do not assume Dashboard flags on a sandbox denial test match production fraud UX.
Device Fingerprints
A Device fingerprint is a way to combine certain attributes of a device (operating system, IP address, device language settings etc.) in order to identify unique devices.
Unit partners with select providers to detect and prevent potential fraud. To enjoy improved protection, you must add the device fingerprint to new application.
Implementation
Installation
For production use:
<script src="https://web-scripts.unit.co/unit-fraud-sdk.js"></script>
For sandbox use:
<script src="https://web-scripts.s.unit.sh/unit-fraud-sdk.js"></script>
Usage
After adding the script tag, the SDK will automatically initialize and collect device information:
try {
  const deviceFingerprints = await window.UnitFraudSDK.getDeviceFingerPrint();
  // output: [{"provider": "...", "value": "..."}, {"provider": "...", "value": "..."}]

  const applicationData = {
    // ... your application data ...
    deviceFingerprints: deviceFingerprints
  };

  await submitApplication(applicationData);
} catch (error) {
  console.error('Error getting device fingerprints:', error);
}
Installation
The Fraud SDK is part of the Unit React Native SDK:
- npm
- yarn
npm install @unit-finance/react-native-unit-sdk
yarn add @unit-finance/react-native-unit-sdk
Usage
import UnitSDK from '@unit-finance/react-native-unit-sdk';
import type { UNFingerprintResult } from '@unit-finance/react-native-unit-sdk';

// Initialize early in your app lifecycle
UnitSDK.manager.initialize();

const getDeviceFingerprint = async (): Promise<UNFingerprintResult[]> => {
  const fingerprintResults = await UnitSDK.manager.fraud.getDeviceFingerprint();
  // Include in your application submission
  return fingerprintResults;
};
Core Interfaces
interface UNFraudManagerInterface {
  getDeviceFingerprint(): Promise<UNFingerprintResult[]>;
}

interface UNFingerprintResult {
  provider: UNFingerprintProvider;
  value: string;
}

enum UNFingerprintProvider {
  Socure = 'socure',
}
Changelog
1.0.2 (June 1, 2026)
- Fix:
UNFingerprintProvider.Socurevalue is now lowercase ('socure')
1.0.0 (May 18, 2026)
- Initial release
- Device fingerprinting via Socure
Installation
Add the Unit SDK or Unit Fraud SDK to your app's build.gradle:
dependencies {
    // Full SDK (includes Fraud SDK)
    implementation 'co.unit:unit-sdk:1.0.1'

    // Or Fraud SDK only
    implementation 'co.unit:unit-fraud:1.0.1'
}
unit-fraud is included in unit-sdk. Add the full SDK if you need other Unit capabilities, or add only unit-fraud for a smaller dependency footprint.
Usage
// Initialize in your Application class or early in the app lifecycle
UnitFraudSDK.manager.initialize()

// Get device fingerprints when needed
UnitFraudSDK.manager.getDeviceFingerprint { result ->
    if (result.isSuccess) {
        val fingerprintResults = result.getOrNull() ?: emptyList()
        // Include in your application submission
    } else {
        val error = result.exceptionOrNull()
        // Handle error
    }
}
Core Interfaces
interface UNFraudManagerInterface {
    fun initialize()
    fun getDeviceFingerprint(completion: UNDeviceFingerprintCompletion)
}

typealias UNDeviceFingerprintCompletion = (Result<List<UNFingerprintResult>>) -> Unit

data class UNFingerprintResult(
    val provider: UNFingerprintProvider,
    val value: String
)

enum class UNFingerprintProvider(val value: String) { SOCURE("socure") }

sealed class UNFingerprintError : Throwable() {
    object GeneralError : UNFingerprintError()
    object SocureInitializeError : UNFingerprintError()
    object SocureProcessDeviceError : UNFingerprintError()
}
Changelog
1.0.1 (May 28, 2026)
- Fix:
UNFingerprintProvidernow exposes a lowercasevalueproperty (SOCURE("socure"))
1.0.0 (May 14, 2026)
- Initial release
- Device fingerprinting via Socure
Installation
Add the Unit SDK or Unit Fraud SDK via Swift Package Manager:
dependencies: [
    .package(url: "https://github.com/unit-finance/unit-ios-sdk.git", from: "1.0.0")
]
UnitFraud is included in UnitSDK. Add the full SDK if you need other Unit capabilities, or add only UnitFraud for a smaller dependency footprint.
Usage
// Initialize in your AppDelegate or early in the app lifecycle
UnitFraudSDK.manager.initialize()

// Get device fingerprints when needed
UnitFraudSDK.manager.getDeviceFingerprint { result in
    switch result {
    case .success(let fingerprintResults):
        // Include in your application submission
    case .failure(let error):
        // Handle error
    }
}
Core Interfaces
public protocol UNFraudManagerProtocol {
    func initialize()
    func getDeviceFingerprint(completion: @escaping UNDeviceFingerprintCompletion)
}

public typealias UNDeviceFingerprintCompletion = (Result<[UNFingerprintResult], UNFingerprintError>) -> Void

public struct UNFingerprintResult {
    public let provider: UNFingerprintProvider
    public let value: String
}

public enum UNFingerprintProvider { case socure }

public enum UNFingerprintError: Error {
    case generalError
    case socureInitializeError
    case socureProcessDeviceError
}
Changelog
1.0.0 (May 14, 2026)
- Initial release
- Device fingerprinting via Socure
Features
The Device Fingerprint SDK collects various device attributes including:
- Operating system and version
- Browser type and version
- Screen resolution
- Device language settings
- IP address
- Time zone
- Hardware information
- And more...
Troubleshooting
If you encounter any issues:
- Ensure the script tag is properly added to your HTML
- Check your browser's console for any error messages
- Verify that you're using the correct script URL for your environment (production vs. sandbox)